Road to PRS: We are Talking About Practice
Posted by Cory Ross on Nov 30th 2022


In the post-Covid world, times are tough. Inflation is soaring, gas prices have peaked, and ammo is still expensive and hard to find. On top of that, reloading components are about as common as CNN telling the truth. That means people are less likely to spend hours at the range honing their craft and advancing their skill set. So, with that in mind, Venture Out heads to the range with our Ruger Precision Rifle and two boxes of ammo to see what we can accomplish with only 40 rounds.
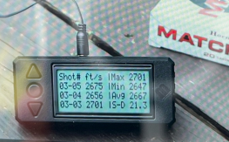
The first step in any range visit is confirming zero and velocity. To do this I shoot either off a bench or from a prone position and shoot at a target 100 yards out with my Magneto Speed chronograph affixed to the end of the barrel. This is an important step to make sure everything is in proper working order and also gives a shooter a chance to “warm-up.” Things to focus on are trigger and breathing control, follow through, and recoil management from a controlled position. If these factors cannot be locked in while shooting from a bench or prone, then the translation to obstacles will be much more difficult. Zero and velocity confirmation should take between 5-10 rounds. This step might take up a quarter of the rounds you have available to practice with, however, this will help prevent any quirks or sighting issues while practicing.
For our first practice scenario we will shoot off a barricade with multiple shooting positions. This could be a DIY barricade built from home (Here is a link from our friends at Springfield Armory to help you build one) or something as simple as a 5-step ladder. The distances you shoot at will be dependent on your range. Shooting at multiple distances is always better, however if a fixed distance is all that is available, that will work. Alternate between two different spots on the barricade (or more if you are feeling confident) shooting two shots from each position while also alternating distances (if you have that option). This will help with identifying the target and quickly engaging it, while also working on dialing or holding for distance. Furthermore, it will help with gear management as you adjust between positions. Run through this drill five times. To increase the pressure and realism, add a timer to it.
At this point there is between 10 and 15 rounds left. The remaining rounds should be focused on building a skill that you are weakest at. If you have difficulty shooting movers, that could be something to work on—however, most people do not have that luxury at their local range. For me, unsupported kneeling and gear management are issues. As a beginner in the PRS world, I find building upon basic positions, such as prone, kneeling, and standing, go along way on a competition stage. So for the last bit of practice, I try to find awkward barriers, such as logs, railings, or even the backside of a chair to shoot off of to force myself to contort and steady in difficult positions. Here, I learn what gear is best for a given scenario so that at an actual match I am not as surprised.
The last thing to work on, even when all of your ammunition has been spent, is target acquisition. This works best at longer ranges that possess multiple targets at varying distances. Essentially this is identifying the target then laying down the rifle and quickly acquiring it. It’s maybe one of the most important skills in PRS. New shooters spend more time trying to find the target then actually shooting. I timed out on a number of stages, simply because I spent too much time through the scope trying to find the target.

Spending time practicing, even if in a limited capacity, will go a long way in match preparation. The key is getting comfortable shooting in modified positions while trying to acquire the target. Still, the best part about practicing is it gets you out shooting and enjoying the sport! During a match, look at the things you need to work on a keep note of that. From there, build a practice regime around it. Sometimes this can be done at home through dry-firing or at the range. Practice, preparation, and a plan to implement those two is the difference between beginners and pro-shooters.

READ MORE:
 |
 |
|
|
 |

Featured Products

RUGER
Ruger 10/22 MLOK .22 LR 18.5" Barrel 10 Round Semi Auto Black
Lightweight polymer stock features M-LOK slots at the 6 o'clock position, textured panels on the pistol grip and forend and integral sling swivel mounts. BX-Trigger with a light, crisp 2.5 - 3 pound...

RUGER
Ruger LCP MAX 380 Acp 2.8" Barrel 10+1 Round Black
Specifications and Features: Description: RUG LCP MAX 380 BLK MS 10RD DE Brand: Ruger Model: LCP MAX Type: Pistol: Semi-Auto Caliber: 380 AUTO Finish: Black Nitride Action: Double Action Only Stock:...

RUGER
Ruger 10/22 250th Anniversary .22 Lr 13.5" Barrel 10 Round
Commemorates America's 250th Anniversary with our original 10/22 Carbine design and a special "Made in the 250th Year of American Liberty" engraving on the receiver. Detachable 10-round rotary...

ONEHORSE
One Horse OH-15 5.56mm 16 " Socom Barrel 30 Round M-LOK Handguard
One rifle built for every mission. The One Horse OH-15 16? AR15 delivers dependable performance, smooth cycling, and rock-solid accuracy without breaking the bank. Designed as a true all-around...

KEL TEC
Keltec KS7 18.5" 7+1 12 Gauge Pump Action Shotgun
The Keltec KS7 18.5" 7+1 12 Gauge Pump Action Shotgun is a reliable and compact firearm designed for various applications. Its 12-gauge chamber and 3-inch barrel make it suitable for a range of...
 20 Bx/ 25 Cs")
FRONTIER AMMO
Hornady Frontier FR200 5.56 NATO 55 GR FMJ 20 Rounds
Hornady's Frontier FR200 5.56 NATO ammunition offers a reliable choice for shooters. With its full metal jacket bullets, this ammo is designed for accuracy and consistency. The 55-grain weight...

CCI
CCI 5200 Blazer Brass 9mm 115 GR FMJ 50 Rounds
CCI 5200 Blazer Brass 9mm 115 GR FMJ 50 Rounds is a reliable choice for shooters who demand high-quality ammunition. Built to SAAMI standards, this rimfire ammo is designed for performance and...